Connecting to AC Power Supply
The following table lists the AC power supply specifications:
AC Power Specifications
|
Item |
Description |
|---|---|
|
Power Supply |
Two hot swappable, power supply modules for power load sharing and AC power redundancy in case of failure of one of the modules |
|
Input Ratings |
Dual universal power supply 100-240 VAC, 50-60 Hz, 7A max. |
|
Connection to Electrical Outlet |
AC power supply inlet |
|
External Power Cable Connector Type |
3-Conductor power cord |
|
Safety Standards |
IEC60950-1, UL60950-1 |
| ● | Both Power Supply modules (1 and 2) must be connected. Ensure that you connect each one to a different AC power supply source. Two Power Supplies provide 1+1 power load-sharing and redundancy. The AC power sockets are located on the device's rear panel. |
| ● | The two AC power sources must have the same ground potential. |
| ● | The device must be connected (by service personnel) to a socket-outlet with a protective earthing connection. |
| ● | Use only a certified 3-conductor power cord, utilizing 18 AWG or 1 mm2 wires, and no longer than 4.5 meters (14.8 ft). |
| ● | If a failure occurs in any one of the Power Supply modules, replace the module immediately. For replacing the Power Supply modules, see Replacing the Power Supply Modules . |
ご注意
本製品に添付の電源ケーブルは、
| ➢ | To connect the device to AC power supply: |
| 1. | Connect the AC power cord (supplied) to one of the power sockets located on the rear panel. |
Connecting to AC Power
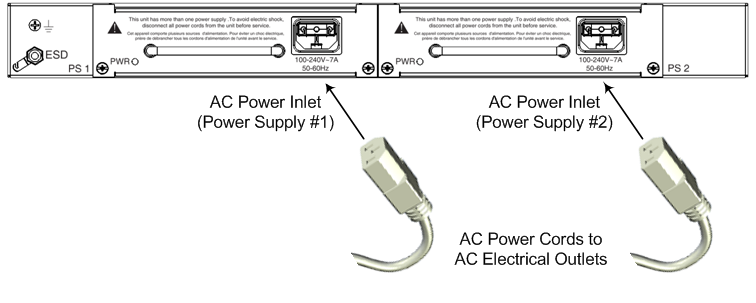
| 2. | Connect the other end of the power cord to a standard AC electrical outlet (100-240V~50-60 Hz). |
| 3. | Repeat steps 1 through 2 for connecting the second Power Supply module, but using the power socket associated with the second Power Supply module and connecting this to a different supply circuit. |
| 4. | Turn on the power at the power source (if required). |
| 5. | Check that the POWER LED on each Power Supply module (front panel) is lit green, indicating that the device is receiving power. |